Ghost: 用docker搭建Ghost博客详细过程(nginx+https证书全套)
【概述】
- 简单docker搭建Ghost
- 复杂docker-compose搭建Ghost+Nginx
步骤概述:
解析域名启动docker容器- 就可以访问网页了
详细步骤:
- 域名:
购买服务器VPS+解析域名 - 环境:创建帐号,并预设权限
- 环境:安装docker和docker-compose
- 环境:
创建docker网络,用于串联ghost和nginx等容器 - 博客:
配置ghost的映射目录和博客配置文件 - 博客:
创建运行ghost容器 - 代理:
配置nginx映射目录和代理配置文件 - 代理:
创建运行nginx容器 - 证书:
创建运行certbot容器,并更新证书 - 部署成果,访问成功
下面就开始一个折腾的部署过程
【1 购买服务器VPS+解析域名】
- Linode注册充值
官网:www.linode.com
推荐码:注册充值时,填写推荐码,可以获得20美金赠送。
推荐码:acd1469162f9392327ba6850077ea3512a521ec3 - Linode创建多个实例
- ping一番,考察下哪里的服务器快,保留快的那个实例,其它都可以删了
- 部署centos7系统,linode4669841_tokyo » Dashboard » Deploy an Image
- 在域名服务商那,修改dns记录,添加a记录指向你的服务器IP
【2 创建帐号,并预设权限】
- 切换到root管理员,创建后续用到的ghost专用帐号
# 创建帐号
[root@instance-20210526-1447 ~]# groupadd ghost
[root@instance-20210526-1447 ~]# useradd -m -g ghost ghost -c "Ghost Blog User"
[root@instance-20210526-1447 ~]# passwd ghost
Changing password for user ghost.
New password:
Retype new password:
passwd: all authentication tokens updated successfully.
[root@instance-20210526-1447 ~]# mkdir /www
[root@instance-20210526-1447 ~]# mkdir -p /www/ghost
[root@instance-20210526-1447 ~]# mkdir -p /www/nginx
[root@instance-20210526-1514 ~]# chown -R ghost:ghost /www
[root@instance-20210526-1447 ~]# ll /www | grep ghost
drwxr-xr-x. 3 ghost ghost 21 May 26 07:01 ghost

#设置ghost用户的docker执行权限
[root@instance-20210526-1447 ~]# chmod +w /etc/sudoers;vi /etc/sudoers;chmod -w /etc/sudoers;
[root@li1696-145 ghost]# chmod +w /etc/sudoers;vi /etc/sudoers;chmod -w /etc/sudoers;
#修改sudoers文件,
#使得用户ghost执行docker相关命令时,不需要密码
ghost ALL=(ALL) NOPASSWD: /usr/bin/docker,/usr/bin/docker-compose,/usr/bin/yum
[root@li1696-145 ghost]# sudo su ghost
[ghost@li1696-145 ghost]$ cd ~
[ghost@li1696-145 ~]$ ls
[ghost@li1696-145 ~]$ ls -a
.  ..  .bash_history  .bash_logout  .bash_profile  .bashrc
[ghost@li1696-145 ~]$ vi .bashrc
alias docker="sudo /usr/bin/docker"
alias docker-compose="sudo /usr/bin/docker-compose"
alias apt-get="sudo /usr/bin/yum"
[ghost@li1696-145 ~]$ source ~/.bashrc

# 弃用centos默认的firewalld=
[ghost@instance-20210526-1514 nginx]$ sudo su
[sudo] password for ghost:
[root@instance-20210526-1514 nginx]# systemctl stop firewalld
# 启用iptables管理 22,80,443
[root@instance-20210526-1514 nginx]# yum install -y iptables-services
[root@instance-20210526-1514 nginx]# systemctl start iptables
# 拷贝iptables备份文件覆盖/etc/sysconfig/iptables
[root@instance-20210526-1514 nginx]# vi /etc/sysconfig/iptables
[root@instance-20210526-1514 nginx]# cp /home/ghost/iptables /etc/sysconfig/iptables
cp: overwrite ‘/etc/sysconfig/iptables’? yes
[root@instance-20210526-1514 nginx]# systemctl restart iptables.service
【3 安装docker和docker-compose】
# 更新yum包
[root@instance-20210526-1514 ~]# yum update
Loaded plugins: fastestmirror ...
Determining fastest mirrors ...
Resolving Dependencies
    [...一堆需要更新的包名...]
Dependencies Resolved
    Installing:	[...一堆包...]
    Updating:	[...一堆包...]
Running transaction check
Running transaction test
Transaction test succeeded
Running transaction
  Updating:    [...一堆包...]    97/97
Installed:   [...一堆包...]
Updated:  [...一堆包...]
Replaced:  [...一堆包...]
Complete!
[root@instance-20210526-1514 ~]# yum install -y epel-release
Loaded plugins: fastestmirror
Loading mirror speeds from cached hostfile ...
Installed:
  epel-release.noarch 0:7-9
Complete!
# 使用官方源
[root@instance-20210526-1514 ~]# yum-config-manager --add-repo http://download.docker.com/linux/centos/docker-ce.repo
[root@instance-20210526-1514 ~]# yum install docker-ce
* docker安装
[root@instance-20210526-1514 ~]# yum install docker-ce
Loaded plugins: fastestmirror, langpacks, product-id, search-disabled-repos, subscription-manager

This system is not registered with an entitlement server. You can use subscription-manager to register.

Loading mirror speeds from cached hostfile
...
...
Dependency Installed:
  containerd.io.x86_64 0:1.6.33-3.1.el7        docker-buildx-plugin.x86_64 0:0.14.1-1.el7  docker-ce-cli.x86_64 1:26.1.4-1.el7  docker-ce-rootless-extras.x86_64 0:26.1.4-1.el7
  docker-compose-plugin.x86_64 0:2.27.1-1.el7

Complete!
[root@instance-20210526-1514 ~]# systemctl start docker # 启动docker服务
[root@instance-20210526-1514 ~]# systemctl enable docker # 设置为开机服务
Created symlink from /etc/systemd/system/multi-user.target.wants/docker.service to /usr/lib/systemd/system/docker.service.
[root@instance-20210526-1514 ~]# docker version
Client: Docker Engine - Community
 Version:           26.1.4
 API version:       1.45
 Go version:        go1.21.11
 Git commit:        5650f9b
 Built:             Wed Jun  5 11:32:04 2024
 OS/Arch:           linux/amd64
 Context:           default

Server: Docker Engine - Community
 Engine:
  Version:          26.1.4
  API version:      1.45 (minimum version 1.24)
  Go version:       go1.21.11
  Git commit:       de5c9cf
  Built:            Wed Jun  5 11:31:02 2024
  OS/Arch:          linux/amd64
  Experimental:     false
 containerd:
  Version:          1.6.33
  GitCommit:        d2d58213f83a351ca8f528a95fbd145f5654e957
 runc:
  Version:          1.1.12
  GitCommit:        v1.1.12-0-g51d5e94
 docker-init:
  Version:          0.19.0
  GitCommit:        de40ad0

# 安装docker-compose
[root@instance-20210526-1514 ~]# sudo curl -L "https://github.com/docker/compose/releases/download/v2.18.1/docker-compose-$(uname -s)-$(uname -m)" -o /usr/bin/docker-compose
[root@instance-20210526-1514 ~]# sudo chmod +x /usr/bin/docker-compose
[ghost@instance-20210526-1514 certbot]$ docker-compose version
Docker Compose version v2.18.1
【4 创建docker网络】
[ghost@instance-20210526-1514 ~]$ docker network create ghost_net
6622eb06ad225655bf8b680a0de93825413ad8569b98d2ba0bc7cf60fb5b752b
[ghost@instance-20210526-1514 ghost]$ docker network ls
NETWORK ID NAME DRIVER SCOPE
8dce76598c2e bridge bridge local
179cc6d32121 certbot_default bridge local
3ba098121ff5 ghost_net bridge local
67fca2971343 host host local
d837e32119cb none null local
【5 配置ghost的映射目录和博客配置文件】
- 宿主机目录将用于映射到容器里被读写,做到程序和数据分离
[ghost@instance-20210526-1514 ghost]$ mkdir -p data/var/lib/ghost/content
[ghost@instance-20210526-1514 ghost]$ mkdir -p data/var/lib/ghost/current/content
[ghost@instance-20210526-1514 ghost]$ cat data/var/lib/ghost/config.production.json
{
"url": "https://ghost.atibm.com/",
"server": {
"port": 2368,
"host": "0.0.0.0"
},
"database": {
"client": "sqlite3",
"connection": {
"filename": "/var/lib/ghost/content/data/ghost.db"
}
},
"logging": {
"transports": [
"file",
"stdout"
]
},
"process": "systemd",
"paths": {
"contentPath": "/var/lib/ghost/content"
}
}
【6 创建运行ghost容器】
- ghost镜像介绍
- https://hub.docker.com/_/ghost/
- 信息显示现在最新的版本有 1.19.0, 1.19, ..., latest
- 配置容器参数
[ghost@instance-20210526-1514 nginx]$ cat /www/ghost/docker-compose.yml
version: '3.8'

services:
  ghost:
    container_name: ghost
    restart: unless-stopped
    image: ghost:5.30.0 #4.24.0 # 4.5.0
    #privileged: true
    networks:
      - ghost_net
    volumes:
      - /www/ghost/data/config.production.json:/var/lib/ghost/config.production.json
      - /www/ghost/data/content:/var/lib/ghost/content
      - /www/ghost/data/currentcontent:/var/lib/ghost/current/content
networks:
  ghost_net:
    external: true
- 使用ghost用户启动ghost容器
[ghost@instance-20210526-1514 ghost]$ docker-compose up -d
[+] Building 0.0s (0/0)
[+] Running 1/1
 ✔ Container ghost  Started                                                                                                                           1.9s
[ghost@instance-20210526-1514 ghost]$ docker-compose logs
ghost  | [2024-06-12 02:06:35] INFO Ghost is running in production...
ghost  | [2024-06-12 02:06:35] INFO Your site is now available on https://ghost.atibm.com/
ghost  | [2024-06-12 02:06:35] INFO Ctrl+C to shut down
ghost  | [2024-06-12 02:06:35] INFO Ghost server started in 4.068s
ghost  | [2024-06-12 02:06:37] INFO Database is in a ready state.
ghost  | [2024-06-12 02:06:37] INFO Ghost database ready in 5.194s
【7 配置nginx映射目录和代理配置文件】
[ghost@instance-20210526-1514 ~]$ cd /www/nginx
[ghost@instance-20210526-1514 nginx]$ cat data/nginx.conf  # 映射的nginx配置文件
user  nginx;
worker_processes  1;

error_log  /var/log/nginx/error.log warn;
pid        /var/run/nginx.pid;

events {
    worker_connections  1024;
}

http {
    include       /etc/nginx/mime.types;
    default_type  application/octet-stream;

    log_format  main  '\$remote_addr - \$remote_user [\$time_local] "\$request" '
                      '\$status \$body_bytes_sent "\$http_referer" '
                      '"\$http_user_agent" "\$http_x_forwarded_for"';

    access_log  /var/log/nginx/access.log  main;

    sendfile        on;
    #tcp_nopush     on;

    keepalive_timeout  65;

    #gzip  on;

    include /etc/nginx/conf.d/*.conf;
}

[ghost@instance-20210526-1514 nginx]$ cat data/conf.d/default.conf  # 映射的代理配置模板文件
server {
    listen       80;
    #server_name  localhost;
    server_name localhost nginx.atibm.com;

    #charset koi8-r;
    #access_log  /var/log/nginx/host.access.log  main;

    location / {
        root   /usr/share/nginx/html;
        index  index.html index.htm;
    }

    #error_page  404              /404.html;

    # redirect server error pages to the static page /50x.html
    #
    error_page   500 502 503 504  /50x.html;
    location = /50x.html {
        root   /usr/share/nginx/html;
    }

    # proxy the PHP scripts to Apache listening on 127.0.0.1:80
    #
    #location ~ \.php$ {
    #    proxy_pass   http://127.0.0.1;
    #}

    # pass the PHP scripts to FastCGI server listening on 127.0.0.1:9000
    #
    #location ~ \.php$ {
    #    root           html;
    #    fastcgi_pass   127.0.0.1:9000;
    #    fastcgi_index  index.php;
    #    fastcgi_param  SCRIPT_FILENAME  /scripts$fastcgi_script_name;
    #    include        fastcgi_params;
    #}

    # deny access to .htaccess files, if Apache's document root
    # concurs with nginx's one
    #
    #location ~ /\.ht {
    #    deny  all;
    #}

    # Let's encrypt
    location ^~ /.well-known/acme-challenge/ {
        root    /usr/share/nginx/html;
    }

    location = /.well-known/acme-challenge/ {
        return 404;
    }

}

[ghost@instance-20210526-1514 nginx]$ cat data/conf.d/ghost.conf  # 映射的ghost博客代理配置文件
# redirect all http traffic to https
server {
    listen 80;
    server_name ghost.atibm.com atibm.com www.atibm.com;
    # google adsense ads.txt
    location /ads.txt {
        alias /usr/share/nginx/html/ghost/ads.txt;
    }
    return 301 https://$host$request_uri;
}
# redirect some domain https traffic to https://ghost.atibm.com
server {
    listen 443 ssl;
    server_name atibm.com www.atibm.com;
    ssl_certificate /etc/letsencrypt/live/ghost.atibm.com/fullchain.pem;
    ssl_certificate_key /etc/letsencrypt/live/ghost.atibm.com/privkey.pem;
    location /ads.txt {
        alias /usr/share/nginx/html/ads.txt;
    }
    return 301 https://ghost.atibm.com$request_uri;
}
# defined ghost.atibm.com 443
server {
    listen 443 ssl;
    server_name ghost.atibm.com;
    ssl_certificate     /etc/letsencrypt/live/ghost.atibm.com/fullchain.pem;
    ssl_certificate_key /etc/letsencrypt/live/ghost.atibm.com/privkey.pem;
    root /var/lib/ghost/current/core/server/public;
    access_log /var/log/nginx/ghost-access.log main;
    error_log /var/log/nginx/ghost-error.log warn;
    location /ads.txt {
        alias /usr/share/nginx/html/ghost/ads.txt;
    }
    location / {
        proxy_pass         http://ghost:2368;
        proxy_set_header     Host $host;
        proxy_set_header     X-Real-IP $remote_addr;
        proxy_set_header    X-Forwarded-Proto https;
        proxy_set_header     X-Forwarded-For $proxy_add_x_forwarded_for;
        proxy_connect_timeout     150;
        proxy_send_timeout     100;
        proxy_read_timeout    100;
        proxy_buffers        4 32k;
        client_max_body_size    10m;
        client_body_buffer_size    128;
    }
}
【8 创建运行nginx容器】
[ghost@instance-20210526-1514 nginx]$ cat /www/nginx/docker-compose.yml
version: '3.8'

services:
  nginx:
    container_name: "nginx"
    image: nginx:1.21.0
    restart: unless-stopped
    #privileged: true
    volumes:
      - ./data/nginx.conf:/etc/nginx/nginx.conf
      - ./data/conf.d:/etc/nginx/conf.d
      - ./data/html:/usr/share/nginx/html
      - ./data/logs:/var/log/nginx
      - /www/certbot/data/letsencrypt:/etc/letsencrypt
    networks: [ghost_net]
    ports:
      - "80:80"
      - "443:443"
    environment:
      - NGINX_HOST=nginx.atibm.com
      - NGINX_PORT=80

networks:
  ghost_net:
    external: true

[ghost@instance-20210526-1514 nginx]$ docker-compose up -d
[+] Building 0.0s (0/0)
[+] Running 1/1
 ✔ Container nginx  Started
【9 创建运行certbot容器,并更新证书】
- 流程说明
用certbot docker -> 通过certbot certonly命令 -> 用邮箱向letsencrypt.org申请更新 -> 配合域名TXT验证记录 -> 获得证书文件 -> nginx配置读取证书文件 -> 访问https://ghost博客成功
[ghost@instance-20210526-1514 ~]$ cd /www/certbot/
# 容器配置文件
[ghost@instance-20210526-1514 certbot]$ cat /www/certbot/docker-compose.yml
version: '3.8'

services:
  certbot:
    container_name: "certbot"
    image: certbot/certbot:v1.14.0
    restart: unless-stopped
    tty: true
    stdin_open: true
    volumes:
      - ./data/letsencrypt:/etc/letsencrypt # 将获取的证书导出到容器外的工作文件夹
      - ./data/backup:/var/lib/letsencrypt/backup
    entrypoint: "/bin/sh" # 必须使用 entrypoint 而不是 command, 以重写 certbot image 的 entrypoint

# 创建运行certbot容器
[ghost@instance-20210526-1514 certbot]$ docker-compose up -d

# 进入容器
[ghost@instance-20210526-1514 certbot]$ docker-compose exec certbot sh
/opt/certbot #
# 查看证书有效期
/opt/certbot # certbot certificates
Saving debug log to /var/log/letsencrypt/letsencrypt.log

- - - - - - - - - - - - - - - - - - - - - - - - - - - - - - - - - - - - - - - -
Found the following certs:
  Certificate Name: ghost.atibm.com
    Serial Number: 336402f715a5e2e8d9a37e60f3ef22bebdc
    Key Type: RSA
    Domains: ghost.atibm.com
    Expiry Date: 2021-08-25 04:34:08+00:00 (VALID: 29 days)
    Certificate Path: /etc/letsencrypt/live/ghost.atibm.com/fullchain.pem
    Private Key Path: /etc/letsencrypt/live/ghost.atibm.com/privkey.pem
  Certificate Name: ghost.atibm.com
    Serial Number: 4dc16882a468e352fe437d1e10c0bae5bf7
    Key Type: RSA
    Domains: ghost.atibm.com
    Expiry Date: 2021-08-25 23:53:11+00:00 (VALID: 29 days)
    Certificate Path: /etc/letsencrypt/live/ghost.atibm.com/fullchain.pem
    Private Key Path: /etc/letsencrypt/live/ghost.atibm.com/privkey.pem
- - - - - - - - - - - - - - - - - - - - - - - - - - - - - - - - - - - - - - - -
- 更新你的域名证书
[ghost@instance-20210526-1514 certbot]$ docker-compose exec certbot sh
# 这句命令的效果是申请4个域名到一个证书里,按提示输入你的邮箱,能收件就行。
/opt/certbot # certbot certonly -d ghost.atibm.com -d atibm.com -d www.atibm.com -d trilium.atibm.com  -d triliumcn.atibm.com --preferred-challenges dns --
server https://acme-v02.api.letsencrypt.org/directory --manual

Saving debug log to /var/log/letsencrypt/letsencrypt.log
Plugins selected: Authenticator manual, Installer None
Enter email address (used for urgent renewal and security notices)
 (Enter 'c' to cancel): youraccount@mail.com

...
Account registered.
Requesting a certificate for ghost.atibm.com and 4 more domains
Performing the following challenges:
dns-01 challenge for atibm.com
dns-01 challenge for ghost.atibm.com
dns-01 challenge for trilium.atibm.com
dns-01 challenge for triliumcn.atibm.com
dns-01 challenge for www.atibm.com

- - - - - - - - - - - - - - - - - - - - - - - - - - - - - - - - - - - - - - - -
Please deploy a DNS TXT record under the name
_acme-challenge.atibm.com with the following value:

0j_CAdI8yxRO2yQRmm4pFeyz2bvqdQNJmb4Hc65nAII

Before continuing, verify the record is deployed.
- - - - - - - - - - - - - - - - - - - - - - - - - - - - - - - - - - - - - - - -
Press Enter to Continue

# 到这一步先别往下,停住,把这串编码,添加到你的域名txt记录里
# txt _acme-challenge.atibm.com 0j_CAdI8yxRO2yQRmm4pFeyz2bvqdQNJmb4Hc65nAII
# 如果登录域名管理后台也能完成操作,但我使用api token调用完成
# 再开一个新的VPS终端连接,进行操作
# 需要用到 dns-lexicon包,容器没销毁之前,安装一次就行
/opt/certbot # pip install dns-lexicon
/opt/certbot # lexicon namecom create atibm.com TXT --name _acme-challenge --content 0j_CAdI8yxRO2yQRmm4pFeyz2bvqdQNJmb4Hc65nAII --auth-username 域名网站的登录帐号 --auth-token 这里是你域名商提供的api_token

# 如果添加成功,会显示以下信息
RESULT
---------
246028402

# 刚才那个证书申请界面,可以继续了,会提示成功如下
Cleaning up challenges
Subscribe to the EFF mailing list (email: xxx@xxx.xxx).

IMPORTANT NOTES:
 - Congratulations! Your certificate and chain have been saved at:
   /etc/letsencrypt/live/ghost.atibm.com/fullchain.pem
   Your key file has been saved at:
   /etc/letsencrypt/live/ghost.atibm.com/privkey.pem
   Your certificate will expire on 2024-09-10. To obtain a new or
   tweaked version of this certificate in the future, simply run
   certbot again. To non-interactively renew *all* of your
   certificates, run "certbot renew"
 - If you like Certbot, please consider supporting our work by:

   Donating to ISRG / Let's Encrypt:   https://letsencrypt.org/donate
   Donating to EFF:                    https://eff.org/donate-le


# dns记录销毁
/opt/certbot # lexicon namecom delete atibm.com TXT --name _acme-challenge --auth-username 域名网站的登录帐号 --auth-token 这里是你域名商提供的api_token
-
到这一步,nginx已经能访问证书文件,并且也能处理你的博客访问,需要刷新一下配置
/opt/certbot # exit #从certbot容器退出,回到宿主机
[ghost@instance-20210526-1514 certbot]$ docker exec nginx nginx -s reload -
后续证书到期之前,会有邮件通知你,进certbot容器更新一下就行了
/opt/certbot # certbot renew
Saving debug log to /var/log/letsencrypt/letsencrypt.log

- - - - - - - - - - - - - - - - - - - - - - - - - - - - - - - - - - - - - - - -
Processing /etc/letsencrypt/renewal/ghost.atibm.com.conf
- - - - - - - - - - - - - - - - - - - - - - - - - - - - - - - - - - - - - - - -
Cert not yet due for renewal

- - - - - - - - - - - - - - - - - - - - - - - - - - - - - - - - - - - - - - - -
The following certificates are not due for renewal yet:
  /etc/letsencrypt/live/ghost.atibm.com/fullchain.pem expires on 2024-09-10 (skipped)
No renewals were attempted.
- - - - - - - - - - - - - - - - - - - - - - - - - - - - - - - - - - - - - - - -
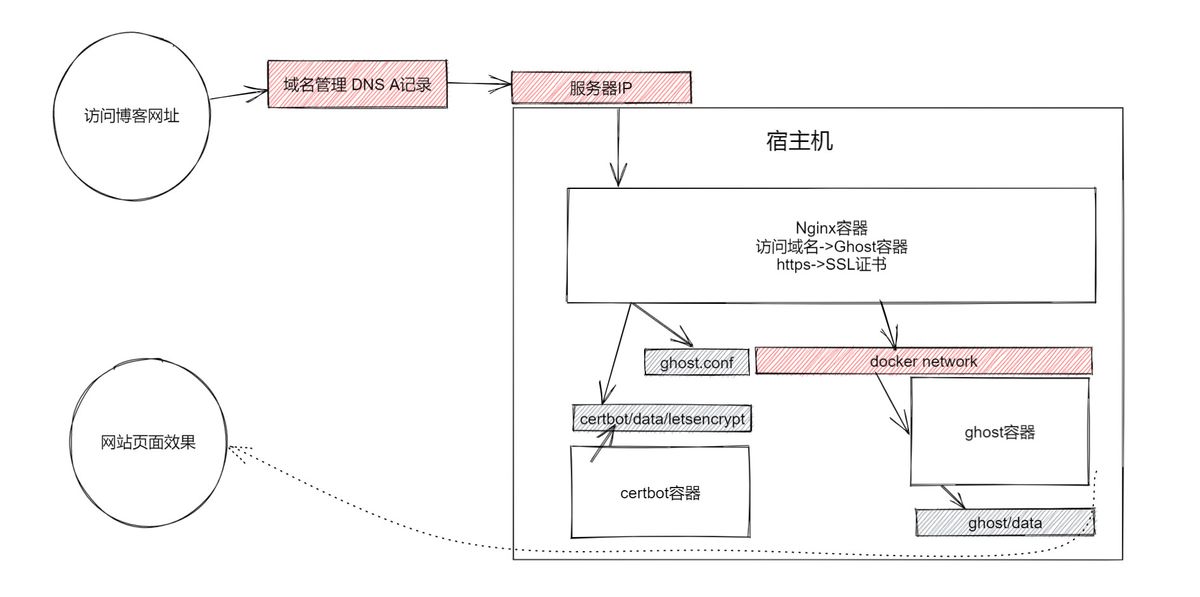
【10 部署成果,访问成功】
- 博客地址:现在我们访问【ghost.atibm.com】
- IP解析:经过【域名 dns】解析到【服务器】
- 反向代理:由【服务器 nginx服务】做代理处理,访问内部网络【服务器 docker network:ghost_net】
- 博客服务:找到并访问【服务器 ghost服务】+【服务器 certbot服务生成的证书文件】,博客数据存储到【ghost容器映射宿主机目录】下,
- 经过一番折腾,我们实现了代理、程序、数据、证书全部分离,并一起工作,并且后续维护简单,比如升级ghost,备份数据等等。
备份:后续还要编写一键备份脚本,免费实现数据安全
扩展性:当然还可以体验别的网站程序,比如wiki、ss、leanote、trilium等
运维:有了vps挺爽的,可以随便玩,加上docker的易维护,不怕服务器搞坏
服务器:同时也可以在linode再次新增一个实例出来调试,不影响现有网站
linode已经闲置了,感谢支持
![本站ghost升级5.30.0+disqus评论功能记录[已取消]](/content/images/size/w960/2023/01/2023-01-20_092633.png)
